Posts

Showing posts with the label #UsingMetaMask

"ICO Contract" Example (Send Token in Exchange for Ether)

In this post i can send Ether to the Creator Account as a donation from another Account Ive also created a Token Contract where you can s end Tokens to Another Account In this post, i will make use of both concepts with the following assumption: I have a company and i would like to go ICO. Initial coin offering  ( ICO ) is an unregulated and controversial means of crowdfunding via use of cryptocurrency, which can be a source of capital for startup  companies . So if someone or a company wants to help me setup my company and get some Initial Coins. My initial Coins are Tokens and i accept Ether in exchange for the Token. So the process goes as follows. 1. I Deploy my TOKEN contract with an initial of 1000 2. Another Account will send me Ether and i will send back some Coins. 3. My Exchange Rate is 1 to 1. So for Every Ether, i will send 1 Token back to the person who gave me Ether. In the Code below, i am giving 7 Tokens for any amount pragma solidity ^0....

Crypto-Currency "Coin Contract" Example

Image
So here is my starting point pragma solidity ^0.4.18; //Used like an Interface in C# or Java contract Token { function totalSupply() public constant returns (uint256 supply) {} function balanceOf(address _owner) public constant returns (uint256 balance) {} function transfer(address _to, uint256 _value) public returns (bool success) {} function transferFrom(address _from, address _to, uint256 _value) public returns (bool success) {} function approve(address _spender, uint256 _value) public returns (bool success) {} function allowance(address _owner, address _spender) public constant returns (uint256 remaining) {} //needed to Log the Events event Transfer(address indexed _from, address indexed _to, uint256 _value); event Approval(address indexed _owner, address indexed _spender, uint256 _value); } contract StandardToken is Token { mapping (address => uint256) balances; mapping (address => mapping (address => uint25...

Creating Decentralized Apps Part 2

In this post i will be using javascript to call a contract deployed using Remix IDE and ethereum-js Test RPC(nodeJs) The contract being deployed is pragma solidity ^0.4.0; contract NumberGetNextNumberAresh{ uint index; function getNumber() returns (uint) { index = index + 1; return index; } function myConstantMethod(string a) constant returns (string d) { return a; } function myConstantNumber() constant returns (uint) { return index; } } To get the ABI or  "Interface ABI"   Follow this POST for the "Contract Address" Follow this POST After Deploying you should now be ready to create a UI (interface with html) The html will contain javascript as well <html> <head> <title>Smart Contract Ethereum</title> </head> <body> <fieldset> <button onclick="send()">Send Data</button> <button onclick="...

Send Ether using Javascript and Html

In this post i will be using an html file and javascript to send Ether from one account to another account. the Ideal scenario is "Donations". From one account to another account(Author/Organization). In this process i will make use of Metamask and Web3 and Ropsten Test Net. An Event listener waits for the load of the website and checks if its Web3 Compatible, before proceeding. For the Chrome browser to be Web3 Compatible, it needs to have Metamask installed. Note: You cant run this on your computer as an Html File  Due to browser security restrictions . you will need a web server such as Apache or IIS . <html> <head> <title>Smart Contract Ethereum Aresh</title> </head> <body> <fieldset> <label> Ether: <input type="text" id="amount"></input> </label> <button onclick="sendmoney()">Donate to Aresh</button> <div id="response"...

Testing using MetaMask Part 2 "Executing the Contract"

Image
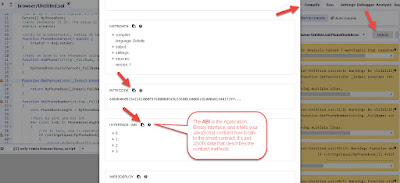
Before writing any javascript code we first need to deploy the contract after deploying we will need 2 things 1. The Contract address 2. The Contract ABI In the next post i will be showing how to use the "web3 Deploy" to get the Contract Address. On the Remix - Solidity IDE. Make sure you are on the "Compile" Tab. Click on the "Details" Button for a popup. scroll down to see the "Interface ABI". (Not needed if you are using Remix IDE) Deploy the contract using the "Web3 Deploy" to get the Contract Address  (Not needed if you are using Remix IDE) Make sure you have Remix IDE open with MetaMask. You will notice the Account Number and number of Ether match. Make sure you have selected "Injected Web3"  Click the "Create" to see a popup Window Requesting for the Transaction. Click "Submit" to Accept the transaction. You will need to wait a minimum of 15 Seconds. In my case i waited ...

Testing using MetaMask Part 1 "Getting Ether"

Image
Download MetaMask On Chrome Browser Accept The "Privacy Notice" Accept The "Terms of Use" Give it a "Password" you wont forget Copy the "Vault" Created to an external text file and save it Select the "Ropsten Test Network" You currently have Zero Ether. Click "Buy" Click the "Ropsten Test Faucet" to open the website Click the "Request 1 Ether from Faucet" and wait for a few seconds Verify from your MetaMask that you have the 1 Ether. Whenever you run out of test ether, you can always request again using the same process